This isn’t about food… But it’s about life, expectations, beliefs, community, communication and, ultimately, love… And I can get behind the message here. With love, Michelle xoxo

The Raw.Honest.Loved.Project


monablogbeccablogaardeblogcherylblogedenblogjameyblogjennieblog

ktblog

Have you ever spent an evening with fifteen other women that was filled with only positive energy? Where there was no gossip, no cattiness, no bullshit, no sneers from across the room, no whispering behind someone else’s back, etc?

Yeah, me neither.

Until Friday, February 8th.

The evening started with the majority of these women never having met. There were shy introductions, nervous small talk while everyone got comfortable and cozy. Drinks of choice helped to calm some initial nerves. And then it began – the discussing, revealing, crying, sharing, hugging, affirming, LOVING. And, of course, the photographing, as you can see…but that felt like a side note in the whole scheme of things.

Why were we doing this? Let me give you a brief description of why.

You’ve probably seen the movie “Mean Girls”, and I’m sure you related to at least SOMEthing in it, whether you…

View original post 8,580 more words

I can't really justify a long shopping list when I have all that in the right-hand column already in the house!

I can’t really justify a long shopping list when I have all that in the right-hand column already in the house!

I confess… I’m not so great at meal planning. The biggest obstacle for me is having four people in the house who eat significantly different diets. I do try, though, and I feel like I did well last weekend in preparation for this week. So far, I’ve brought my lunch with me to work each day and, while that may not seem like a big deal, it’s an achievement for me.

To do my planning, I took a piece of note paper, folded it in half, and wrote all the major things I had on hand in the right-hand column. The list was surprisingly long, even to me… It’s easy to forget what’s in the house when it’s split between the fridge, freezer and pantry! That made it really simple to construct a list of only a few vitally important ingredients (like coconut oil – I had less than a tabelspoon left, the horror!).

What’s fascinating to me is how far you can stretch most foods if you take just a little bit of time (an hour or two of your weekend) to do this kind of review then pick the items for your shopping list with the abundance already in mind. Mindfulness leads to conscious belly-full-ness. Also, keeping in mind that simplicity is sometimes the key and complexity wins out at other times, I relieve myself of the pressure to make meals look a certain way in order to satisfy some limiting belief that “Lunch must contain a starch, a vegetable and a protien” or any other dogmatic preconceptions.

If you enjoy learning more about meal planning or could do with some valuable assistance with this task, please visit Leanne Vogel over at Healthful Pursuit – her site is full of valuable insight, advice, recipes and AMAZING photography that’ll have you pulling ingredients out of the pantry before you’re even finished reading a single post! (In my case, I’m often preparing them in my head when I read her blog over breakfast.)

Do you have any special tricks to assist you with your meal planning?

20130312-145619.jpg
Brown Rice Quinoa Burgers (vegan with vegetarian options in notes)

1 cup Brown rice
1/3 cup Quinoa (red or black), rinsed
1 ½ cups finely chopped veggies*
1 Tbsp. minced garlic
Generous seasonings to taste: salt, pepper, Italian seasoning, red pepper flakes
1-2 Tbsp. Nutritional yeast
1 Tbsp. Flax meal
Coconut oil for sautéing

Yields about 10-12 patties

*I used carrots, celery, red bell pepper & red onion. Most anything you like or have on hand will work, but if you use a leafy green, I wouldn’t “sweat” it with the thicker veggies – it will get plenty cooked when you pan fry the patties.

Add brown rice to 2 ¼ cups water and a pinch of salt to a fairly large pot. Bring to a boil then reduce to very low, cover, and cook for about 35-50 minutes until tender and most of the water is absorbed but not all – you want a little of the rice gluten to help bind the burgers. In a different pot, add the rinsed quinoa to 2/3 cup water. Bring to a boil then reduce to very low for about 15 minutes or until the water is absorbed.

While the grains are cooking, add about a tablespoon of coconut oil and the minced garlic to a small pan on medium-low to medium. When the oil has melted, add the veggies and a generous amount of seasoning, more than you would if you were going to eat the veggies simply sautéed as-is. Don’t forget to use salt, preferably a good quality grey Celtic sea salt, Himalayan pink salt or similar. Sweat them for about 5-7 minutes until onions are just turning translucent.

When the grains and veggies are done, turn off all the burners, stir the rice and quinoa to loosen then let everything set for a little while to cool slightly and for the rice to get a little sticky, maybe 15 minutes. You don’t want it too cool completely, just so it’s not burning hot. While you’re waiting, in a small bowl, mix the flax meal with 3 tablespoons of water to make a flax “egg”; stir well to combine then set aside.

Mix the quinoa and veggies into the brown rice pan using a spatula to combine thoroughly. Blend in nutritional yeast (‘nooch), starting with 1 tablespoon. Taste and adjust seasoning as necessary, add more ‘nooch if desired. Finally, blend in the flax “egg” thoroughly to bind everything together.

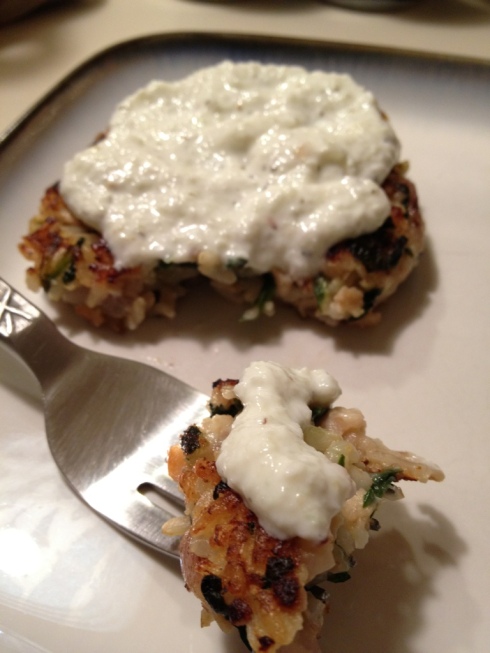
At this point, you have three choices: cook immediately, refrigerate overnight or freeze. If you’re going to cook or freeze, form the mixture into patties about ½ inch thick. To cook: Heat a thin layer of coconut oil in a skillet or frying pan on medium-low and lay patties gently into pan. What you want is a thin, crisp crust that’s darkened but not burnt on the outside of the patty, which takes about 5-7 minutes per side. Enjoy on a bed of salad greens, on a condiment-dressed bun or wrapped in a romaine leaf. To freeze: Layer patties in parchment paper then seal in an airtight container and place in fridge up to three months. Remove, thaw and cook as above. To refrigerate overnight: Spoon mixture into an airtight container and place in fridge. Remove from fridge the following day and allow to sit covered on the counter for 30 minutes to an hour to take the chill off. Form into patties and follow cooking directions above.

Notes:

So far, the “refrigerate overnight” version is my favorite – the flavors have a chance to develop, the binder has time to really set (making the patty a little less fragile) and I don’t have to wait too long for gratification. J I haven’t tried freezing them, but my sister said it works well and I like the ease of being able to make a lot up ahead of time.

Substitutions/Additions:

Since brown rice still has the germ, it gives more structure and a better mouth-feel – I wouldn’t recommend using white rice. Similarly, the red and black quinoa stay firmer than their white cousin; however, if you only have white quinoa on hand, you would be okay making that substitution.

Mushrooms like Portobello would be a good, “meaty” addition (if you like fungi and aren’t allergic to it). Similarly, where no allergy/sensitivity exists, TVP (textured vegetable protein, which is a soy product), can be rehydrated with water according to package instructions added when the flax “egg” is added.

Nearly any veggies could be included: white or sweet potato (shredded), sun-dried tomatoes, baked acorn squash, jalapenos, leafy greens like spinach or kale… I’ve made a very satisfactory version with sweet potatoes, sweet onion and cilantro where I didn’t sauté the veggies at all.

If you don’t have or don’t like nutritional yeast (I just have started to make friends with it) and you are okay with dairy, you can add cheese to the burgers. Feta, bleu cheese, Parmesan, Asiago or any Pecorino would work well as they are strong flavored and firm to hard. I wouldn’t recommend mixing shredded or softer cheeses into the mixture. Also, if you use cheese, you may want to cool the mixture even further after you add the flax “egg” so the cheese doesn’t melt.

Also if you don’t mind using dairy, you can use a good quality butter instead of coconut oil; just watch your temperatures to make sure you don’t scorch the butter (coconut oil can take a higher heat).

I would not recommend substituting chia for flax – the gel that chia makes ends up being too slimy-feeling in the cooked finished product. However, if you prefer to use an egg as a binder rather than the flax, you only need one egg, beaten, and, as with the cheese note above, the grain/veggie mix needs to be fairly cool before you add the egg so it doesn’t cook it.

20130220-072921.jpg

I went on a field trip to our Georgia State Capitol building yesterday. With a busload of third graders. Five of whom were my responsibility. All of us ended up having lunch an hour-and-a-half after our normal lunchtime. I wish I could say that there was something so cool at the capitol that it overshadowed that little lunch detail, but… At least I can say that the kids really were well-behaved and that helped make the trip not suck.

The one thing I can pat myself on the back for is that I took along a salad that I’d like to think would have made a real chef proud: Shaved Vegan Parmesan, sliced cucumber rounds, red bell pepper strips, corn kernels cut from the cob, and soaked raw pecans on a bed of baby spinach, arugula and cilantro and drizzled with a homemade vinaigrette. Okay, I know it doesn’t look “drizzled” in the photo. Frankly, it looks drowned, but in my defense, I hadn’t yet mixed it up. It really wasn’t more than a couple tablespoons worth, I swear.

Simple & Scrumptious Vinaigrette

3 Tbsp Raw Apple Cider Vinegar (I use Bragg’s)
1/3 cup Extra Virgin Olive Oil
1 Tbsp minced garlic (packed in olive oil)
2 Tbsp fresh dill
2 Tbsp Jack Daniel’s(tm) Old No. 7 Mustard (gluten-free)
1 Tbsp hempseed

Place all ingredients except hempseed together in a small blender or food processor (I use a NutriBullet). Blend well, about 30-45 seconds. Pour into airtight container and stir in hempseed. Allow overnight to let the flavors develop fully.

You’re welcome to use freshly pressed garlic if you like – I find I like the jarred version just as well in dressings and usually reserve fresh garlic for dishes I’m going to cook.

20121001-162858.jpg

Here’s a little quickie for a week where I’ll be relying on “quick and easy” but don’t want to sacrifice too awful much in terms of healthful eating. We had this weekend and they went over better than the pizza I made the following night!

When you open a can of crescent roll dough, you can choose to only separate it into rectangles instead of taking the additional step and going all the way to triangles. Actually, I suppose this would work as a triangle, too… But let’s look at the rectangle version since that’s what I did! Place your rectangles flat on a parchment-lined baking pan or a clean counter. Top with whatever you have on hand: ground beef, rotisserie chicken, deli ham, tomatoes, spinach, onions, bell peppers, pesto, spaghetti sauce, cashew paté – use your imagination AND clean out your fridge at the same time! Woot!

The best part here is that you can tailor each individual serving to the person who will be lucky enough to consume it! When you’ve put your chosen toppings on top, just roll the dough up around it like you were going to make the crescent rolls after all. These baked up slightly quicker than the time recommended on the can. Maybe check yours when there’s about two minutes left on the baking time, especially if you are NOT using an AirBake (insulated) pan.

20121001-163039.jpg

Mine is the one with spinach, rotisserie chicken and vegan cheese, the Noodle Dude’s had chicken and regular cheese and Mouse? Well, yeah, his just had cheese in it – I knew he’d eat plenty of fruit to offset the simplicity of the crescent roll-up!

I realize you could make your own dough and get tons more creative, but these fit our needs exactly without anyone having to spend much time in the kitchen at all. I made myself an extra one but ended up saving it for breakfast the following morning. They’re easy to carry along and should reheat well, assuming all of your toppings are microwave-friendly. It won’t win any blue ribbons but it hits the spot and it’s still better (and CHEAPER) than fast food!

Baking Lessons from the School of the Eternally (Insanely) Optimistic Chef*

(*Note: I eschew the moniker “baker” in respectful deference to all the true bakers of the world. I am not worthy. I should probably offer the same respect for the title “chef” because I haven’t earned it in any formal way. Still, I’m far more accomplished at meal foods than baked goods, so let me have my little fantasy, m’kay?)

Aside: In an attempt to get more use out of my nook color, I’m composing this post via the WordPress app on the Android platform. So far, it’s actually not too bad. It may mean, however, that there are no pictures this time… We shall see.

Um… Okay. That’s how it’s gonna be, huh?

Alright… Moving on…

This was another last second muffin attempt. I don’t know why I try this over and over – it never works. But I did at least look up muffin recipe RATIOS this time so they turned out better than the last batch. I will eat them even if no one else in the house will. Punks.

Banana-Chocolate Muffins

Dry Ingredients:
1 1/2 c all purpose flour
1/2 c coconut flour
1 t baking powder
1/4 c baking cocoa powder
1 T flax-chia meal (I grind my own)
1/4 c brown sugar

Wet Ingredients:
1 egg
3/4 c applesauce
2 bananas
1/2 c raw cashews
1/4 c raw pepitas
1/2-3/4 c chocolate almond milk

Put the cashews and pepitas together in a large bowl with hot water – set aside to soak.

Mix all dry ingredients, form a well in the center, then set aside.

Crack egg into large mixing bowl then add bananas and mash well. Add applesauce and mix thoroughly. Drain cashews and pepitas and place the two together in a small food processor. Grind well, adding some of the other wet ingredients as needed to get it into a paste-like consistency. Mix with remaining wet ingredients except almond milk.

Stir wet ingredients into dry but don’t over mix. When combined, add almond milk until it has an almost batter-like consistency, not too firm, not too runny.

Fill muffin tins 2/3 or more full – these really don’t rise much. I used parchment paper cups with no grease or non-stick spray and they came right out, no sticking at all! (This was probably the biggest success of the whole recipe. Facepalm.)

These are quite dense muffins, but they’re not bad. And pretty healthy, no oil, decent protein and other nutrients. Some day I might actually get to the point where I can offer bonafide nutrition statistics. One day… Maybe.

Happy Eating!!

Ain’t it purdy?

Okay, I’m going on a weird tangent right off the bat… Wanna come along? I chose this title for the post mostly because I like alliteration but also because creating beautiful food that also tastes delicious is a lovely aspiration – and still a wonderment for me because I can usually nail one aspect then fall short on the other. Generally speaking, my food tastes pretty good but ain’t so fair of face. I guess I’d rather it go like that, though I challenge myself to strike the balance on both. BUT… The title really popped a totally different thought into my head:

Oddments and Tweeks

Where did that come from? Thanks to Mr. Google, I know our dear pal Ms. Rowling is responsible for that (along with Nitwit and Blubber), beginning in Book 1 of the Harry Potter series. According to a quick search, the Oddment part refers to Slytherin and Tweek to Hufflepuff. I’ll let you do your own research and drawn your own conclusions if you’re so inclined.

I like the way they sound together… Oddment and Tweek. And I think there’s a cooking analogy here: we often use the odd, leftover bit of something or many somethings to create something scrumptious on its own, tweaking a tried-and-true recipe here and there depending on what we happen to have on hand. It’s really the essence of home cooking – making your food uniquely part of YOU!

So… I couldn’t have bought a thought as coherent as anything above when I was actually in the kitchen cooking this last night. I got the quinoa cooked with relative ease but everything devolved from there. The eight-year-old came home from playing and I had to crack the whip on him to do his homework, walking him painstakingly through each step as he yawned at me and threatened to tear up (a clear, non-verbal “back-off, Mommy”) while the three-year-old did his best impression of a thirteen-year-old PMSing girl… Burst out crying that I was “angry at him” when I told him he couldn’t have his hot dog yet (because it was still too hot for him to eat, for crying out loud… and boy, was it loud!).

I thought I would have, in the end, two recipes to share. I was really keen on that idea because it would have been like a two-fer: Almost all the same ingredients, one prep session, lots of leftovers. In my book, that’s just about perfection! Alas, it’s more like one and a half… And half a recipe doesn’t really translate so well, so I’ll outline it but you’re on your own if you choose to stumble along the path with me.

So there was my disclaimer; here’s my caveat: you can just make a bigger pot of soup if you want to use all the ingredients. Add water or chicken stock or a second box of potato leek soup as it suits you. You’ll see what I mean.

Pretty ingredients, all in a row.

Quinoa Corn Soup and Quinoa Corn Muffins*

(*partial recipe – proceed at your own risk)

1 cup quinoa (uncooked) – I mixed 1/2 c white and 1/2 c red
2 ears corn
1 small sweet onion
1 jalapeno
1 box of Imagine Potato Leek Soup
Seasonings to taste – I used salt, Nature’s Seasonings and an Adobo mix from Fresh Market

Rinse the quinoa then add to 2 cups of water in a large pot. Bring to a boil, stir a couple times then turn down to the lowest setting and cover. Cook for 10-15 minutes until water is absorbed.

While quinoa is cooking, dice the onion and the jalapeno (keep the seeds if you like it spicier – I did not this time) and slice the corn off the cob. Mix all three together in a large mixing bowl then add the cooked quinoa, stirring well to mix and add seasonings. Taste test and be aware that the Potato Leek soup is fairly bland on its own. The quinoa will begin to cook the veggies just a little; that’s fine.

Really? The ingredients are so simple and fresh, it’s pretty much edible at this point. Yum!

Pour the boxed soup into the quinoa pot and begin heating it. Once it’s warmed a bit, mix about half the quinoa veggie mixture in IF YOU’RE MAKING BOTH RECIPES. Otherwise, make sure you’ve got enough liquid to handle the whole batch of quinoa veggies.

So the bowl is half eaten… It was delicious and I was really quite famished.

With what’s left of the quinoa veggies, if you’re brave enough, mix in two beaten eggs once the quinoa has cooled a bit (otherwise the eggs will cook up too quickly). Oil a cupcake pan well and press a generous amount of the quinoa-veggie-egg mixture tightly into each cup, overfilling them above the top just a bit so they’ll look like muffins. Bake at 400 degrees for about 25-30 minutes until lightly browned on top.

Wow… That second part sounds like a whole recipe, doesn’t it? Here’s why it’s not really: I couldn’t get the darn things out of the muffin cup in one piece. Oh, sure, here’s a pretty picture of one:

Food styling at its, erm, decent-est?

But I totally faked it. They tasted fine – the hubby had three for dinner and I had two for breakfast, but I think they need some tweaks. And maybe the addition of some shredded potatoes. And maybe some bacon. Because everything’s better with bacon, right?

Houston, we have a problem.

No kidding! Where’s that post I made about the delicious cashew dip? There was one, wasn’t there?!? Hang on a tick!

Upon further review… No, there wasn’t.

And here I was telling my friends during my Pampered Chef party last weekend, “Oh yeah, that’s on my blog!” Hopefully I was talking about my Quinoa Burgers, which ARE here.

This is what happens when you post stuff on Facebook and different stuff on Pinterest and other stuff here or there… No, I won’t even waste your time on links. There’s a post in my drafts queue about a meal I made, like, almost a dang month ago. And there’s this cashew dip – baked and warm and so delicious that I can’t seem to NOT eat it all before I share it so no one else can actually verify its greatness. Shame, that.

Fear not, more posts will be emerging from my brain soon thanks to some writing kickstarting I’m doing / will be doing over the coming weeks. Until then, what kinds of recipes do you like that you haven’t tackled before and want some ideas about? What successes have you had in your kitchens? What not-so-much recipes have you struggled with?

Fair game here – I’d love to hear whatever you’d care to share!

Wait! Those don’t look like “bars”!! Read on, Dear Reader…

“Accidentally Successful” was the working title for this post. I made a batch of what were supposed to be blueberry muffins. They weren’t, exactly, and I was bummed about the perceived baking fail but heartened because I’d whipped up a delightful spread in a vain effort to make the “muffins” taste better. Baking is not my forté… But I often wish it was. More than anything, I’d love to find a muffin / breakfast bar recipe that satisfies both me and my sons so that I can stop having to buy cereal bars in the grocery store. Perhaps what I really need is just a little more patience and perseverance…

I humbly took a sample of my concoction to a friend’s house for her input – I had baked the last of the leftover batter that wouldn’t fit in the muffin cups in an oval ceramic baking dish so it was a flat piece rather than a muffin shape. She liked the texture and flavor well enough to eat and suggested I just rethink the output as bars instead of muffins. After returning home, I tried the muffins again, this time cold from the fridge with a generous slathering of Earth Balance’s crazy good soy-free buttery spread. What. Do. You. Know? It was GOOD! (Even better, the paper muffin liner didn’t stick too badly as long as I pulled it off slowly enough.)

Fail averted – I actually did have more to post than just the spread… But I’ll throw that in, too, because it’s really yummy!

Blueberry Breakfast Bars

Dry Ingredients
3/4 c unbleached, all-purpose flour
3/4 c whole wheat flour
1/2 c rolled oats or 5-Grain hot cereal
1 tsp baking powder
1 tsp pumpkin pie spice
1 tsp salt

Wet Ingredients
1 large banana
1/2 c unsweetened applesauce
1 egg
1/2 c raw walnuts
1/2 c sweet potato, shredded
1T chia seeds
1/2 c milk of your preference
1 c blueberries

Blend dry ingredients well in a large mixing bowl. Mash the banana in another bowl then add the remaining wet ingredients (except the milk and blueberries) in a smaller mixing bowl. Make a well in the dry ingredients and incorporate the wet, stirring thoroughly. Add milk last, just enough to make the batter liquid enough to fold in the blueberries without smooshing them all. Finally, fold in the blueberries then pour into a greased shallow baking dish. Bake for 20-25 minutes at 375-degrees. Allow to cool completely or even refrigerate overnight and slice apart into breakfast bars. Enjoy with butter or almond butter.

Chocolate-Almond Spread

2 Tbsp raw almond butter
2 Tbsp blackstrap molasses
2 tsp raw cacao

Mix. Spread. Enjoy! Refrigerate leftovers… if there are any!

20120810-234209.jpg

Where I went scrounging around for a meal last night, tonight I was determined to make something more… Wholesome. Four-fifteen this morning found me in the midst of a triage, cleaning up my eldest son’s bloody nose caused by overheating as he slept. I hadn’t gone back to sleep so by the time I got off work at 3:30 p.m., I barely had enough juice to make it home. A “quick” two-hour nap later (really, I set the alarm for 45 minutes!), it was after 7 p.m. and I almost gave in. But I needed this tonight.

The title says “better”, which begs the question, “How so?” In large part, because it is NOT a store-bought, rubbery hockey puck. It is light, crunchy and delicious, whether you choose to bake them or pan-fry them. Go wild with your toppings – you won’t regret it!

20120810-234342.jpg

Sweet Potato Quinoa Burger

1/2 cup uncooked quinoa (mixed red and white)
1/2 sweet onion, diced
1/2 green bell pepper, diced
1/2 cup raw pepitas
1/2 sweet potato, shredded
1 egg
1/2 cup garbanzo flour
Salt, pepper, garlic powder and red chili pepper, to taste – don’t be shy, season these guys up!

Put raw pepitas (pumpkin seeds) into 1 cup of hot water; set aside to soak while quinoa cooks.

In a large pot, add quinoa to a cup of water, bring to a boil then cover and reduce to lowest heat. Simmer for 15 minutes or until water is absorbed then fluff and allow to cool a bit.

Combine onion, pepper, sweet potatoes and egg in a large mixing bowl. Season well and set aside.

Drain and rinse pepitas then pulse in a food processor to a rough chop. No need to over process these; just get them broken down so they don’t end up being too huge of a chunk in your final product.

Add pepitas and quinoa to the mixing bowl and mix well with your hands (as you would a meatloaf). Begin adding garbanzo flour, sprinkling in a tablespoon or two at a time, mixing well between each addition. Use as much as you need to take away the excess wet of the egg, adding more if needed. It doesn’t need to be too dry, just not runny.

Form into patties and bake in the oven at 375 degrees for 25 minutes, flipping once in the middle. Alternatively, pan-fry in coconut oil on medium for a few minutes per side. Or you can bake THEN pan-fry briefly to crisp the burger up. Any way you decide, you’ll enjoy a fulfilling meal. I topped mine with mashed avocado and roasted garlic-infused olive oil then opted to skip the bread and wrap it in a romaine lettuce leaf. So good I had a second – and my hubby had a THIRD!

That’s what I call success. Now if I could just convince my offspring to try them…

20120808-211402.jpg

Sometimes it’s about last minute and luck and a wee bit of ingenuity… And maybe a glass of Trader Joe’s inexpensive white table wine. Meals can come about entirely unplanned and are often (in our house, at least) consumed standing up at the kitchen island.

Tonight dictated such a meal – we were scrambling to get dinner, homework, stinky-kid-shower, and bedtime all wrapped up in a ridiculously short amount of time. School started on Monday and we are NOT in anything resembling a routine just yet. I figure we’ll be doing well to wrangle ourselves together by the end of September. One can hope.

So it was that I extracted a peach-mango salsa I had made on Sunday from the fridge to pair with my youngest son’s leftover rice and beans from Moe’s then grabbed an avocado on the verge to mash up into a quick guacamole-esque. Oh yeah, let us not forget the aforementioned wine. It’s not the broccoli spaghetti I had planned on, but when it became apparent that I only had to feed myself, well, I really wasn’t going to expend any more energy than necessary. Ahem.

I’d like to tell you it’s an überfab meal… It’s not that level of awesome, but it is good. It’s vegetarian, made mostly of easily recognizable whole foods, there’s fruit, fiber, protein, healthy fats, and a bit of spicy. In a nutshell, it’ll do just fine.

Guacamole-esque

1 ripe avocado
1T olive oil
Splash lemon juice
Dash salt
Sprinkle garlic powder

Peel an avocado, mash it in a bowl, add the remaining ingredients, stir well and enjoy!

Peach-Mango Salsa

This recipe is great because you don’t have to worry much about the amount of ingredients – you can mostly just use what’s on hand. Watch the cayenne, though – It can get real hot really quick!

1 peach
1 mango
1/2 jalapeño
1/2 sweet onion
2T olive oil
Juice of half a lime
Generous sprinkle of garlic powder & sea salt
Little pinch of cayenne (add more only after a taste test)

Slice onion and jalapeño to similar size and combine in food processor with everything but the fruit. Chop to whatever size you like (I vary between boulder-size chunks and pretty much puréed). Dice fruit to a size you like (I usually do small bites, less than half an inch wide by a quarter inch thick). Mix everything well and allow to mingle. Or suck it down immediately. Whatever strikes your fancy.

Hope this reminds you that dinner – or any meal – doesn’t have to be complicated or require lengthy preparation. The best thing to do is just take that quick moment to survey the situation. Take a couple deep breaths and relax – it’s just food, not rocket science.


Sunflower Seed Avocado:: Persnickety Eater

Sunny, delicious, gorgeous!

Who has a thirty-minute lunch break? Oh yeah, I do! Who has a full-service cafeteria right in their lunchroom? That would be me, too. We’ll call it a “perk” of working at a large manufacturing facility – breakfast, lunch, dinner and snacks, if you please. Heck, I could even drive up there in the middle of the night, were I so inclined. Trust me, I’ve eaten way more than my fair share of mediocre meals, mindless snacks, and unnecessary desserts from there. It’s a well-run organization – the people are nice and will make special orders with a smile.

However…

It’s not MY food. And that’s a big deal to me. I generally select different kinds of foods entirely than what they normally offer. In particular, I rarely eat anything canned or prepared and they often have several dishes of that nature.

So, what’s a busy mommy of two who works full time supposed to eat for lunch? Sandwiches? Most of the time my response to that would be, “Meh.”

However.

I stumbled up an idea not long ago. Granted, it was born out of a slight desperation. Still, it felt “inspired” and so, I share it here in the hopes a few of you might enjoy it as well.

    Sunflower Avocado

20120806-231251.jpg
Take about 1/4 cup raw sunflower seeds and soak them in some warm or hot water for the 30-45 minutes prior to when you’re ready to eat. Drain and rinse at chow time. Grab an avocado and dig out half of it (leave the pit in the other half to help keep it fresh). Mash that green goodness up well then mix in the soaked sunflower seeds. Add a sprinkle of salt, a dash of pepper, a dusting of garlic powder and just a smidgen of olive oil (I keep these four in my desk and use them almost daily). Spread the mixture on some toasted crusty bread and, if you happen to be so blessed, add some fresh, homegrown tomatoes. It’ll give you an open-faced sandwich and you’ll love every juicy bite!

20120805-151010.jpg

When you feel good about yourself, it shows. This cannot be denied, nor the importance of it overlooked. Everyone on this planet has had moments, days, weeks, years when they doubted themselves. It’s rough to go through those times, but I swear, emerging on the other side feels tremendous!

What does this all have to do with a food blog?!? Eating always has been integrally linked to self confidence for me – when mine is low, I am far less conscious and discriminating about the food I put in my body and both my insides and outsides suffer. When I am mindful of my food choices, EVERYTHING else in my world runs more smoothly, sometimes seemingly effortlessly. I can handle stress, worries, problems, challenges and tasks better when I’m well-fed.

It is an amazing thing to behold: Choose to eat foods that feel right to you, to all parts of your mind, body and spirit, and you’ll find yourself automatically attracting the positive relationships best suited for your life!

P.S. The halter top I’m wearing above is a DIY repurposing of an old t-shirt, no sewing required!

20120803-110152.jpg

I might be in love. With two things, actually. The soup I threw together this evening and… Parsley. I’m not in love with having to write this post for the second time since I’m still coordinating the iPhone app with the online postings… Oh well. Some of my witty thoughts may be missing from this version. Can only hope I’ve learned my lesson: refresh the app before you edit and update the post!

Soup is a fickle friend to our family. I think I might be the only one who really likes it. My two little boys won’t eat it and my husband seems to view it as the last bastion of the ailing – he’ll usually only eat it if he’s sicker than a dog. Add to that my lack of proficiency in soup-making and, well, I don’t really hold it against him that this dish didn’t thrill him.

On the other hand, I was tickled pink with the results! This recipe was simple, filling, economical and protein-packed with an anti-inflammatory boost from the parsley. Parsley: it’s not just a throw-away garnish!

Edamame and Quinoa Corn Soup

1/3 c white quinoa (mine was pre-rinsed)
1 bag Cascadian Farms brand frozen, shelled edamame
1 1/2 c Imagine brand Organic Creamy Corn Soup
1/2 sweet onion, diced fairly large
1/8 c parsley, roughly chopped
Seasonings to taste (a dash of cayenne and a bit more salt are must haves)

Add the quinoa to 1 cup of water and bring to a boil. Reduce heat to low simmer and cover for about 10 minutes. Add the frozen edamame and corn soup; increase heat to medium and cook for about 15 minutes, stirring frequently to keep quinoa from sticking to the bottom of the pot. Add onion and seasonings of choice – I like Nature’s Seasonings blend and a Kroger Pizza Seasonings blend in addition to cayenne and salt. Oh, and garlic powder. Cook for about 5 more minutes and test/adjust seasonings as needed. After a couple more minutes, turn off heat and add parsley (please don’t just skip it, I’m begging you – you’ll love what it adds). Serve immediately with crusty wheat bread and olive oil for dipping the bread.

Sometimes, just sometimes, things are so tasty that I’m not really all that sorry that I’m the only one in the house who eats them!

What ingredients are your favorite to use when you’re low on time, cash or patience and you need some at least a half-homemade fare?

20120801-213430.jpg

So, I thought to myself, if I can post to my Blogger blog through an app on my iPhone, surely I can post to my WordPress blog that way as well!

Why in the world did THAT epiphany take so long?!? I’m not sure that my family will love that I’m “playing” on my phone more, but can I tell you, I’m ecstatic!!

Ahem. Mistress of Whatshouldhavebeen Obvious may step aside now so Madame Playsinthekitchen uhLot can take her place.

I like the idea of whole grain dishes that can be eaten cold or room temperature but, having tried making them in the past, I’ve never been thrilled with the results. They are just sort of… Bland. When I make them, that is. Apparently, the Whole Foods folks are far more adept at it than I am. Until… I hit on a simple (and probably obvious) solution: add the “dressing” to the freshly cooked, still hot grains!! Hahaha – Duh!

Wheat Berries with Dried Cranberries and Pecans
1 cup wheat berries
1/4 c dried cranberries
1/4 c raw pecans
1/4 c olive oil
4T raw apple cider vinegar
4T powdered cactus honey

Soak, drain, rinse and cook wheat berries according to package directions. While that is cooking (which takes a while), soak the pecans in room temperature water. When the wheat berries only have a few minutes of cooking time left, mix the powdered honey into the apple cider vinegar and stir to dissolve. Add olive oil and whisk briskly to combine. Drain fully cooked wheat berries then return to pot and pour in olive oil mixture. Add dried cranberries and stir well. Drain and rinse the pecans thoroughly then add to pot; stir to combine. Allow to sit and cool then transfer to fridge. Enjoy cold or at room temperature!

What are your favorite grains to use for “salads” like these?

Mountain Rose Herbs

Mountain Rose Herbs